Welcome to Photoshop 1101E, or also known as PT1101E.
the reasons for this:
1. for myself to keep a record of what i've learnt.
2. for all out there who wants to learn more about photoshop.
Okay. Brief introduction.
Learning photoshop's part of my to-do things for this holidays. And it's user-friendly. Which makes learning very productive and encouraging. The version I'm using is Adobe Photoshop CS2 9.0 I seriously can't remember how on earth it had itself landed here in my laptop. It's either my bro who installed it for me, or it came along with my k800i installation package. Either way, it's a good deal. The book I'm using now for guidance is called "the digital photographer's handbook". It's full of pictures, and offers step-by-step instructions. Goodie good. But it uses version 6.0 as reference. So there's a slight difference. The instructions here will strive to be as concise as possible, no further explanations whatsoever. So, here we go.
The Bare Essentials.
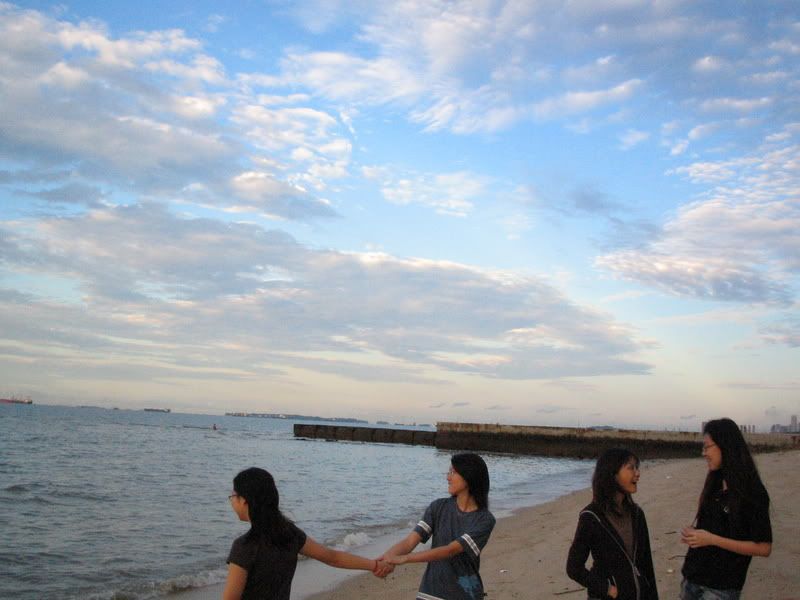
This was my tutorial picture. One of my fav ecp pics.
ONE: To correct exposure.
Choose Image>Adjustments>Auto Contrast.
If there is also a color cast, choose Image>Adjustments>Auto Levels.
TWO: To sharpen image.
Choose Filter>Sharpen>Unsharpen Mask.
'Amount' :: changes the strength of sharpening. usually <120.>
'Radius' :: increases the contrast of edges, so picture appears more sharp. usually >10.
'Theshold' :: Defines how different two areas need to be to constitute an edge.
Cropping.
Is simple. Just click and drag.
But the effects...
ONE: Bring more focus unto the subject.
TWO: Create vertical/horizontal paranomic frame.
THREE: Straighten up skewed horizons, by cropping, rotating, and cropping again.
At the end of tutorial.
What i did to it. First, Auto Levels to correct exposure. Then Unsharpen Mask. Then double-crop it to make the sea level level. haha.
Okay, this post is getting longer than i thought.
To end off.
The Fisheye Effect.
ONE: Choose a picture where the main subject is as near to the lens and to the centre of the frame as possible.
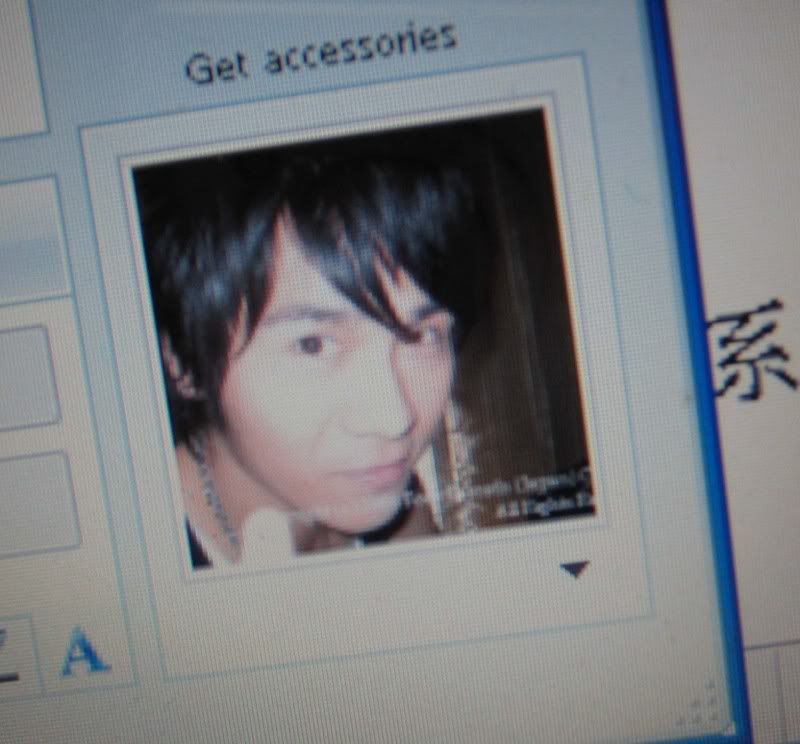
GARY.
TWO: If picture is rectangular, crop it, or squash it into a square.
Choose Image>Image Size.
Uncheck 'Contrain Proportions' and change the longer dimension to match the shorter one.
THREE: Select the entire image and choose Filter>Distort>Spherize.
Set the amount to 100%, normal mode.
FOUR: Using Circular Marquee, make a circular selection of the spherized area.
Hold down the shift key to produce a perfect circle.
Right-click, choose Select Inverse.
Then drop Paint to paint the entire background black, except the spherized area.
FIVE: For the sense of realism, invert the selection again and use Filter>Render>Lens Flare.
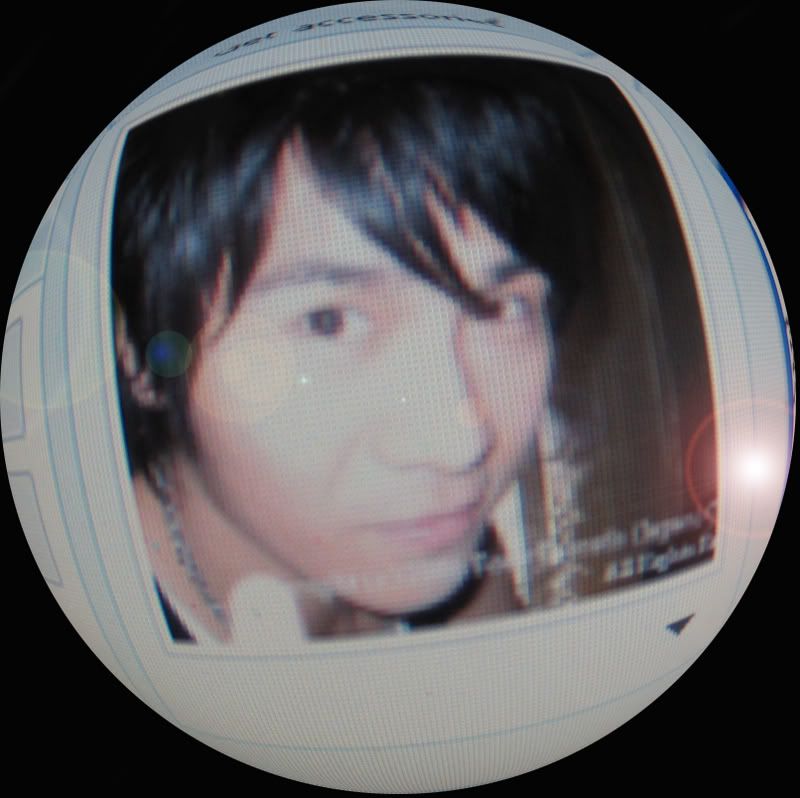
Tah-dah~!
i'm so tired after typing so much. till next time, it's jessehow, signing off~!
the reasons for this:
1. for myself to keep a record of what i've learnt.
2. for all out there who wants to learn more about photoshop.
Okay. Brief introduction.
Learning photoshop's part of my to-do things for this holidays. And it's user-friendly. Which makes learning very productive and encouraging. The version I'm using is Adobe Photoshop CS2 9.0 I seriously can't remember how on earth it had itself landed here in my laptop. It's either my bro who installed it for me, or it came along with my k800i installation package. Either way, it's a good deal. The book I'm using now for guidance is called "the digital photographer's handbook". It's full of pictures, and offers step-by-step instructions. Goodie good. But it uses version 6.0 as reference. So there's a slight difference. The instructions here will strive to be as concise as possible, no further explanations whatsoever. So, here we go.
The Bare Essentials.
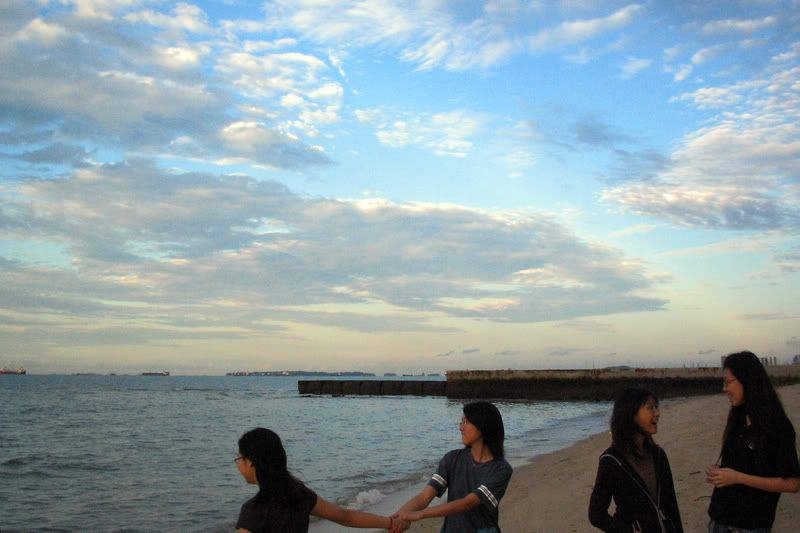
This was my tutorial picture. One of my fav ecp pics.
ONE: To correct exposure.
Choose Image>Adjustments>Auto Contrast.
If there is also a color cast, choose Image>Adjustments>Auto Levels.
TWO: To sharpen image.
Choose Filter>Sharpen>Unsharpen Mask.
'Amount' :: changes the strength of sharpening. usually <120.>
'Radius' :: increases the contrast of edges, so picture appears more sharp. usually >10.
'Theshold' :: Defines how different two areas need to be to constitute an edge.
Cropping.
Is simple. Just click and drag.
But the effects...
ONE: Bring more focus unto the subject.
TWO: Create vertical/horizontal paranomic frame.
THREE: Straighten up skewed horizons, by cropping, rotating, and cropping again.
At the end of tutorial.
What i did to it. First, Auto Levels to correct exposure. Then Unsharpen Mask. Then double-crop it to make the sea level level. haha.
Okay, this post is getting longer than i thought.
To end off.
The Fisheye Effect.
ONE: Choose a picture where the main subject is as near to the lens and to the centre of the frame as possible.
GARY.
TWO: If picture is rectangular, crop it, or squash it into a square.
Choose Image>Image Size.
Uncheck 'Contrain Proportions' and change the longer dimension to match the shorter one.
THREE: Select the entire image and choose Filter>Distort>Spherize.
Set the amount to 100%, normal mode.
FOUR: Using Circular Marquee, make a circular selection of the spherized area.
Hold down the shift key to produce a perfect circle.
Right-click, choose Select Inverse.
Then drop Paint to paint the entire background black, except the spherized area.
FIVE: For the sense of realism, invert the selection again and use Filter>Render>Lens Flare.
Tah-dah~!
i'm so tired after typing so much. till next time, it's jessehow, signing off~!
标签: photoshop
发贴者:me-myself-i 时间
11:13 下午
![]()


1 条评论:
wow, sis, ur pictures are REALLY VERY VERY NICE! I want! :D haha... but yeah, think you've got a great talent in this area... :D do use it more and more to bless God's ppl k? :D (hee it'll be great too if can provide engrish subtitles... my cheena no powerful... haha... nah kidding lah...)
发表评论
订阅 博文评论 [Atom]
<< 主页